Wednesday, October 31, 2018

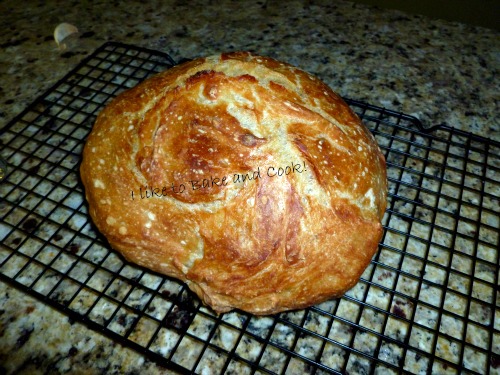
Crusty No-Knead- Bread! Artisan Bread

I had never ever made homemade bread until I came across this recipe.  I figured I'd try it and if I was lucky it may give me a reason to make bread.  Wow better than I expected!  Delicious.  Easy peasy and I don't say that unless it is.  Enjoy!


 It has been a long time goal of mine to make bread.  Good, crusty and light.That's what I was looking for and this is what I totally received. Delicious!

  From my previous encounters with a bread machine I totally gave up and because I thought it would be too difficult I put bread making aside and figured it just wasn't going to happen.  I have lots of patience but figuring my end result would be awful I put this bread making on my back burner to speak.  Well thanks to the Kitchen Whisperer I know now I CAN make a wonderful loaf of bread! 

We've already had several slices with butter while warm.  My only suggestion is wait if possible(use a serrated bread knife to cut) until the bread is 3/4 cooled before you slice.  I was inpatient wanting to taste as well as see how the inside texture turned out.  Success!!!!!   

***Note:  Don't be frightened by the length of the recipe it is NOT involved just wordy.  Try it!  I am sure you'll love it as we did.

Note:  I have made this bread using dried cranberries also.  I did add 1/4 cup of sugar and a 1/2 cranberries to the recipe with the above ingredients and below is a photo of the results.


*** 1/2 cup cranberries were added to the dough and I worked them in as best as I could.


  • 3 cups bread flour
  • 1/2 tsp instant yeast
  • 1 1/2 tsp table salt
  • 1 1/2-3/4 cups water (room temp) I made mine slightly warm from the tap
  • Lidded cast iron dutch oven or clay dutch oven/pot – see note if you do not have one of these!
  • Any add-ins you want (nuts, dried fruits, cheese, spices etc…)
Instructions
In a large bowl add the flour, yeast and salt** If you are making a fruit bread you can use 1/4 cup of sugar if you would like but it is not necessary.
  1.  You need to make sure the bowl is at least 2 times the size as this will easily double in volume.
  2. Whisk to combine.
  3. Add in the warm water and mix with a wooden spoon – do NOT use a stand mixer.
  4. Mix it until it’s combined and forms a ‘shaggy’ dough. Just make sure that all the flour is incorporated. It will not be a smooth dough – that’s how it’s supposed to be.
  5. Cover with plastic wrap and set in a warm place overnight for at least 12 hours but no more than 24.
  6. When you’re ready to bake, put the rack in the middle and preheat to 450F.
  7. When the oven reaches temp, put your dutch oven pot (cast iron or heavy ceramic {check to see that your ceramic can handle 450F temp first!}) in the oven WITH THE LID on.
  8. Let it heat up for 30 minutes.
  9. While that’s heating up, use a dough scraper and scrape your dough onto a heavily floured surface (or you can flour parchment paper and put it on there). *See note
  10. Shape into a ball, tucking the sides under. It will be sticky but that’s good.
  11. Cover lightly with plastic until the 30 minutes is up.
  12. Remove the pot from the oven and plop the ball down in. Or if you transferred it to a floured parchment paper, you can place the whole thing inside (try to remove the excess flour).
  13. Replace the lid and bake for 30 minutes. No peaking!
  14. Remove the lid and bake for another 15 minutes.
  15. Remove from the oven and using tongs remove the bread and cool on cooling rack.
Notes
If you’re not comfortable with shaping the dough, when you remove the pot from the oven after 30 minutes you can carefully just pour the dough into the pot. It won’t be a perfectly round bread loaf but that’s okay – it’s just rustic. If you do pour it in, just jostle the pan around to kind of even out the dough before putting the lid on. But practice with shaping the dough. You can’t screw it up.
Don’t have a dutch oven or clay pot? Never fear! Grab your cast iron pan instead!
1. Take a 12 round cast iron pan (with preferably a 2-3 side wall) and place that into your 450F degree oven (just like the directions on the site). This pan will go on the middle rack.
2. WHILE you are heating that up, place a metal pan on the lowest shelf/rung in the oven at the same time. I just use an old cake pan that has seen better days.
3. When you remove the VERY HOT skillet from the oven and put your dough in it (have the dough resting on parchment paper so the bottom doesn’t get that ‘black’ color from the pan).
4. AND as soon as you put it in the oven put about 3 cups of ice cubes in the hot baking pan. DO THIS FAST as you want to trap the steam in the oven!
5. This will create steam (just like a dutch oven).
6. After 30-35 minutes check the bread. It should be done but if it’s not cook for 10-15 min more. If at 30 minutes it’s getting dark but not done (will sound hollow when tapped), just tent some foil over top for about 10 minutes.
7. Cool as normal.

Easy Baking from my kitchen to yours,


repost 2/13/2018
5/11/13 original

Tuesday, October 30, 2018

Magic Custard Cake

This is a recipe that I have been wanting to make for ages.  I have my impossible coconut pie which is similar in the concept that you don't actually make a crust the crust forms when the cake bakes.  If it's hard to understand I'll try posting the steps to help you.

I was so anxious to cut this cake that although it was cold my knife wasn't as sharp as I would have liked it to be so the cut is not as sharp as I would like.  It's delicious so who cares, right? YUM


Perfect 6/25/17


4 eggs (whites separated from yolks) at room temperature
1 tsp. vanilla extract
3/4 cup sugar
1 stick melted butter
3/4 cup flour
2 cups lukewarm milk
powdered sugar

Preheat oven to 325 degrees.  Grease and line (extend over sides of pan) with parchment paper.

***Make sure to extend parchment paper over sides for easy removal.  I did not and had to remove it when I cut it.


Wipe bowl out in between beating the egg whites and next step.


Separate eggs.


Add egg whites to mixer and beat whites until stiff.  Place egg whites in a bowl and set aside.


Beat eggs yolks and sugar until light.  Add melted butter and vanilla.  Beat for several minutes.  Add flour and mix until it it fully incorporated.

Start slowly adding milk and beat until mixture is mixed well.


Add egg whites, a third at a time using spatula, repeat until all egg whites are folded in. (I used a wire whisk).  Do not over whisk.


Photo is of mixture before baking.  There will be some unmixed egg whites and that is fine.

Pour batter into baking dish and bake for approximately 60 or until top is lightly golden.  Cool completely and dust with powdered sugar.   Delish!


Can be served when completely cooled or as I did overnight.  Serve within a day or two. Sprinkle a little confectionery sugar to add a sweet touch. Enjoy!


Monday, October 29, 2018

Crockpot Root Beer Pork Barbecue


This is the recipe I use for pork BBQ in my crockpot.

I've eaten something similar to this dish at one of the family restaurants and felt it was high time I tried duplicating it. Hubby and grandson loved it!  I'm sure your family will too.  Try this pulled pork knife and fork open faced sandwich.  A sure hit in our house.  Enjoy!

7/9/15


The makings:
Slice bread
store bought refrigerated mashed potatoes heated according to directions
shredded pork BBQ( recipe below)
BBQ sauce to top all.

Note:  I shredded my pork in the food processor.  Mine was too fine. Suggest you use the method I usually do by shredding with two forks. 


  • 2 lb pork loin roast
  • 12 oz can of root beer (your favorite)
  • 18 oz bottle barbecue sauce (your favorite)( I use Sweet Baby Ray's)
  • 8 hamburger buns
  • coleslaw(optional)
Instructions
  1. Place pork in slow cooker.
  2. Pour root beer over the pork.
  3. Cover and cook on low heat for 6 hours or until it shreds easily with two forks.
  4. Remove pork and shred it using two forks.
  5. Drain liquid from slow cooker.
  6. Return shredded pork to slow cooker and stir in barbecue sauce.
  7. Continue heating on low for an additional 30 minutes.
  8. Serve on hamburger buns with coleslaw if desired or you may want to try it my way! Yummy!
My way!  Slice of white toast, mashed potatoes (Bob Evans) barbecue shredded pork. Hot or sweet sauce to garnish !  Yummy!

Saturday, October 27, 2018

Chocolate Brownies with Peanut Butter Frosting!

If you fancy chocolate and peanut butter..this one's for you! 7/16/12


This recipe was adapted from Betty Crocker's Kids Cook Book.  We added white chocolate and peanut butter morsels to it and used my recipe for peanut butter icing.  Deep chocolate taste and if you are a chocolate peanut butter lover it is a must!  I found it to be a bit involved(and it was in a kid's cookbook) but it was worth it. Enjoy!!

5 ounces unsweetened baking chocolate
2/3 cups butter or margarine
3 eggs
1 3/4 cups sugar
2 tsp. vanilla
1 cup flour
1/4 cup white chocolate morsels
1/3 cup peanut butter morsels

Heat oven to 350..Grease a 9 x9 inch pan (we used a 9 x 13)

In a sauce pan heat over low heat chocolate and butter or margarine until chocolate is melted..Take off heat and cool 5 minutes.

Put 3 eggs, sugar and vanilla in mixing bowl..Beat until well blended.  Add melted chocolate to sugar mixture.  Beat at low speed until blended..Add flour to chocolate mixture..Stir in white chocolate and peanut butter morsels. Spread batter in greased pan and bake approx. 40 to 45 minutes for 9 x9 inch pan..approx. 30 minutes for 9 x 13 inch pan.. Frost when completely cooled..

Frosting

2 cups confectionery sugar
2 tablespoons butter melted
approx. 1/4 cup milk(watch amount of milk,start with a little bit at a time)
1 cup peanut butter
Mix above ingredients in mixer..Slowly add milk a little at a time until desired consistency)


Thursday, October 25, 2018

Pepperoni Cheese Monkey Bread or Pull apart Pizza Bread


Always a hit this easy recipe can be adapted anyway you'd like it.

12/15/15


Today when making it I used Country Biscuits, Monteray Jack cheese, mozzarella cheese and Italian grated cheese.  If I could have been a little more adventuresome I'd have added a few other add -ins such as pepper rings, cut up olives etc. but my fussy grandchildren were coming so it had to be as basic as it gets.  

2 cans Pillsbury Biscuits(large)  cut into quarters
2 cups cheese (your favorite pizza cheese)
Italian seasoning if desired (I didn't because I was using pepperoni and that's enough flavoring for me
1/3 cup olive oil
1- 6 oz. package sliced pepperoni cut into small pieces
1 cup Italian cheese


Preheat oven to 350 degrees. In a large bowl place quartered biscuits, cheese and pepperoni and any other add in's you might like.

Toss all with the 1/3 cup olive oil making sure to coat all of the biscuits.

Grease a Bundt pan well with cooking spray. Place several slices of pepperoni on bottom.  Add the biscuit cheese mixture.  Bake for approximately 40 to 45 minutes or until top is browned and center is cooked.  Mine was done in 40 minutes. Remove from oven and gently with a knife loosen ends and center. Flip over immediately onto large dish. Serve with a sauce of choice  I chose Marinara. YUM