Friday, May 5, 2017

Pineapple Fruit Cake!


Truth be told I have never liked fruitcake and when my Mom would make her yearly fruitcakes (yes she made several different kinds) I never ate one slice.  Never ever!  She'd prod and coax but there wasn't anyway she could get me to eat some.  It didn't appeal to me as another one of her favorites Greens and Beans.  I wouldn't taste them either.

I have mastered the Greens and Beans recipe with some alterations but today I decided this fruitcake recipe I had to try.  The recipe calls for using either a Tube pan or two bread pans.  I opted for the two bread pans because we are going to a brunch and I think one of these will be appreciated..

This is rather expensive cake to make so I was skeptical about making it.  Well I am happy to say it is wonderful!  Moist, with lots of pineapple, cherries and walnuts to give it great texture and substance. 

I will post this as my Mom has it written.  I cut back on the sugar and butter (1/2 cup less on each) hoping it wouldn't take away from the taste and I don't feel it did at all.  I will freeze one for later.  I made the loaf pans.  (With the busy holiday season quickly approaching this might be a nice addition to your Thanksgiving or Christmas dinner)


Ingredients:
1 3/4 cups butter                                                1 large can pineapple chunks (20 oz. drained)
2 cups sugar                                                       1- 11oz. jar maraschino cherries drained and cut in pieces
8 eggs                                                                 1 lb. walnuts chopped ( I used 1 cup)
3 3/4 cups flour
2 tsp. baking powder
1 tsp. salt
1 tsp. vanilla


Beat butter and sugar well.  Add 1 egg at a time.  Sift flour and dry ingredients.  Add to mixture. Fold in fruit and nuts.  Bake 325 degrees in well greased and parchment lined(2)loaf or 1 tube pan. Bake approx. 1 hour or until toothpick inserted in center is clean.


I bought these at a kitchen shop in Cleveland but I have seen some similar to them at T.J. Maxx...Teak wood and very durable and I just love the design on them..Very cool..I want more!!!

Happy Baking from my kitchen to yours,


I like to bake and cook/family recipes 11/14/12

11/14/12 original

Thursday, May 4, 2017

Easy Luchada! Italian Apple Pastry!

When my hubby was growing up he loved to go over to his neighbors house(her name was Faustina)and not only did she make the lightest Italian cookies, bread and this wonderful apple/ tart/pastry which she called Luchada it only took 30 years for me to attempt. it.

   I don't have a clue what Luchada means but to my husband it meant sweet apples in a delicate crust loaded with nuts and raisins.   Here is her recipe( my mother in law managed to make it a point to watch her and copy down how many handfuls of this and that she was using) and I am willing to share it with you.  This is definitely a must if you like apples, nuts and raisins..Enjoy!

From my kitchen to yours a special recipe!


LUCHADA (APPLE ROLL)
(Faustina's)
Dough
2 cups flour +1 wine glass (6 oz.) water
1 egg
 pinch salt
1 wine glass (6 oz.) regular oil
Mix all ingredients. Roll like a jelly roll size. Not too thin. Fill with
below filling.

Filling
6 sliced apples
 ½ cup chopped walnuts
1 cup sugar 1 tsp. cinnamon
½ cup raisins
 butter
Mix apples, sugar, raisins, walnuts, and cinnamon. Carefully, place on
top of rolled dough. Dab with several thin slices of butter. Roll gently
like a jelly roll several times. Place dough on greased cookie sheet.
Sprinkle with sugar. Bake 400° for 10 minutes then lower heat to 350° and bake 30 minutes more.


Happy Baking and Cooking from my kitchen to yours,


8/28/12 
2/22/13
1/14/14

Chicken Pot Pie Muffins


Some days I don't plan meals and today was one of those days.  I did take boneless chicken out of the freezer but figured I would either make a grilled salad or sauteed dish for our dinner but I really didn't give it too much thought.  That changed after my grocery store stop.

I had been out running a few errands and stopped at the grocery store to pick up milk and caught the hot food section where what appeared to be muffins staring me right in the eye.  I glanced and asked the clerk what the muffins were and she said chicken pot pie.  I was tempted to buy them but figured since I had planned on making some sort of chicken dish tonight that I'd play with some ingredients and try my hand at making these. Easy recipe and sure yummy!

Here's what I did.  I took my 3 boneless chicken breasts, added about 7 cups water, celery and salt.  Cooked the chicken until it was tender. (45 minutes or so)  Removed the chicken, diced, and set it aside. (about 2 cups chicken).  While the chicken was cooking, I diced a carrot and a stalk of celery.  **You could add the celery and carrot to your chicken while cooking and dice it after but for some reason I didn't.  Strained the soup and drained the veggies and proceeded to make these delicious chicken pot pie muffin cups. I know you could easily saute chicken or use canned but I wanted the homemade broth so it took a few extra minutes to prepare. ** Also you could easily make this recipe the night before to save time and refrigerate it until ready to prepare.

If my text is a little wordy I am trying to say exactly how this meal was done.  I know there are more short cuts that you can take.  For example:  store bought Rotisserie chicken, frozen veggies and if necessary canned creamed soup.   I did use Stove Top stuffing mix which I usually wouldn't do as I love my own homemade stuffing but since I had a box that was about to expire I used it which turned out to be quite tasty and a nice flavorful touch

Re-post for your convenience. :)


3 cups chicken broth(homemade or canned broth)
1/2 cup milk
2 T butter or margarine melted
2 T flour
2 cups diced chicken
3/4 cup carrots and celery (or use 1/2 pkg. frozen vegetables)(I diced a carrot and a celery stalk for mine and cooked until slightly tender). Drain
1- 6 oz. pkg.(box) Stove Top stuffing mix (chicken)


 Place Stove top stuffing in a large bowl.  Set aside

In a medium size bowl place chicken broth and milk. Add flour and melted butter.  Whisk until blended.  Add cooked chicken, carrots and celery. Stir.  Pour over stuffing mix and stir until all stuffing mix is completely coated.  If necessary add a little more chicken broth so that mixture is soft and spoonable. 

Using a  LARGE  well greased MUFFIN pan place several huge tablespoons(3/4 full) of mixture. ( This recipe made 6 LARGE  muffin cup servings).


 Bake 375 degrees approximate 20 to 30 minutes or until slightly browned on top.  Remove from oven let set for a few minutes and using a small spatula remove from muffin pan.  Serve with vegetable of choice and the below white sauce. I did serve peas as an added side.


White sauce:
1 T butter or margarine
1 T cornstarch
1/2 cup chicken broth
1/2 cup 2 % milk
salt and pepper to taste


In a small pan place butter.  Add cornstarch, chicken broth and milk. Continue cooking on medium heat while stirring(use a whisk if possible) until mixture thickens slightly.  Serve over muffins. YUM


9-5-14
10/29/16
11/12/16


Oh my Strawberry Pie with real Whipped Cream :)


Heavy whipping cream really adds to the pie!  Yummy!


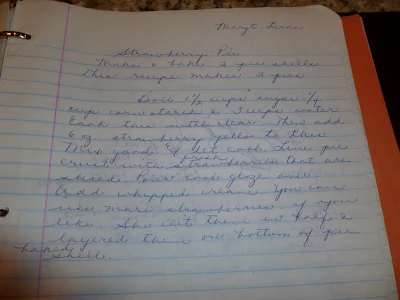
Mom wrote down Mrs. Lucas's original recipe.


This recipe was inspired by my mom's neighbor Mrs. Lucas and of course she made it long ago and today was my first attempt to make it.   I have to say it was very easy and I made the two pies.  I gave one to my very appreciative daughter and of course one for me and the hubby! One of the many great things about summer is STRAWBERRIES!!  Enjoy!

Happy Baking from my kitchen to yours,
 
MJ


1 1/2 cups sugar
1/4 cup corn starch
3 cups water
**2 - 3 oz. pkgs. strawberry jello
2 + containers fresh sliced strawberries (It depends on how full you want your pie to be)
1 pt. heavy whipping cream (whipped with 4 T. confectioners' sugar and 1 tsp. vanilla)
1 pkg. (two shells) refrigerated pie crust baked according to directions. 

**Note:  The above recipe is the way it was written.  I only had 1- (3oz) pkg. strawberry jello and I found it to be fine. You can do either.

This recipe makes 2 pies

Bake pie crusts according to pkg. directions.  Cool completely!

Place first 3 ingredients in a large pot and whisk together. On medium heat, cook slowly until mixture starts to bubble and becomes clear.  Add strawberry jello and mix well. Cool completely.

Using your favorite pie dish place refrigerated dough in pie dish and bake accordingly. I pkg. will make two pies.  Fill with strawberry filling.

Note:  Make sure pie crusts are cool before filling.

Place strawberries mixture in baked pie shell.  Pour cooled glaze over pie and refrigerate until totally set.  Top with heavy whipped cream. Fabulous :)
  

7/7/12
5/27/13
7/13/16

 
All recipes and their respective images are the sole property of I Like to Bake and Cook2013, all rights reserved. All content herein is meant for your personal enjoyment only and is in no way to be used for commercial purposes. Use of this site automatically constitutes your agreement to these terms.

Wednesday, May 3, 2017

Italian Pizzelles!!


It's so popular I had to do a re-post for those who miss this recipe.

Pizzelles are a favorite of my grandchildren and many of our family and friends.


  I can't make enough of them and the fact that I have gone through two grilles and that I am on my third should tell you something..My last two grilles had the recipe printed right on the handle so I had it always at my fingertips..but when I threw out my last one thank goodness I remembered to copy the recipe because this new one's recipe for pizzelles is very different.  My pizzelles are usually a little thicker and not as thin as the new recipe and my family likes them better..Here is the recipe and some pictures:

1 cup margarine softened  (you can use butter only butter browns them quicker) You will have to be careful
2/3 cup sugar
3 eggs
2 to 2 1/2 cups flour
1 tsp. baking powder
1 tsp. anise, orange or vanilla extract
pinch salt

With electric mixer beat sugar and margarine until creamy..Add eggs and extract, continue to beat.  Add flour, baking powder and salt.  Mixture will be soft..Spray pizzelle grille with cooking spray.  Let pizzelle grille heat thoroughly.
When the grille is heated drop by heaping teaspoons onto hot grille. Tighten lid.   Watch carefully!  It only takes about a minute or two to be ready..

Note:  If you do not have a grille check any Italian grocery store they should have them.  Also, do not get the Teflon coated one.  The surface is not forgiving to scratches.

Perfect!

Palmer Electric (non teflon) Model 1000  Pizzelle maker. The BEST!


Drop by (full) teaspoon..one on each side


Let cool on rack... You may want to make a double batch..They'll be gone in no time..

Happy Baking!


3/30/13
7/5/11
12/18/13