Showing posts with label Chocolate Lovers. Show all posts

Tuesday, January 8, 2019

Boston cream poke cake


Making another Poke cake!  Boston Cream that is.  Yum

A quick note:  Make sure your icing is of medium consistency.  Mine was too thin and as you will see in the photo it was syrup looking.  

Note: icing should spreadable or pourable but not thin. 

 I really will make this again with determination since my original recipe for Boston Cream Cake is awesome I was playing with the recipe to make it easier for the holidays.  Not as pretty but still delicious.  Enjoy!


***A quick thought. You can Fill the holes with chocolate pudding and top with cool whip.


2/27/17


1 pkg. white cake mix prepared according to directions
1 large vanilla instant pudding prepared according to directions or 1 regular size if you are only filling holes. 
13x9 inch pan
Spray pan .  Bake cake according to directions

When baked remove from oven and poke large holes in cake immediately..

Cool completely.

While cake is baking make pudding according to directions and set aside.


When cooled fill holes with pudding( note: just fill holes(large)use either end of a large whisk or something the size of a nickel.  Save extra pudding for use later for those who like more pudding! 
Icing cake with cocoa topping. Refrigerate until ready to serve.

Topping
2 cups Confectioners sugar 
4 T Cocoa
Milk
A tsp at a time
8 oz. Cool whip optional
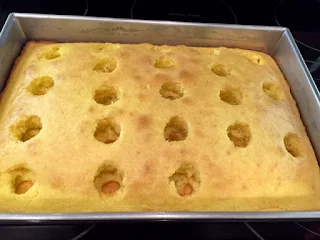


Example of size of holes.  Pudding needs larger size than you would use for jello liquid when making a poke cake with jello.


Happy Baking from my kitchen to yours,


Friday, November 2, 2018

Eggless Tiramisu! A Birthday dessert for me!

 Re-post of one of my favorite desserts. A great Christmas Dessert idea from my kitchen to yours, xo

easy. 


It's my birthday and I'm eating dessert! and it's before dinner.  I can do whatever I want and I like it!

  As my grandson's says "I'm Boss"..whatever that means but I'm thinking that's a good thing or so I'm hoping.  Enjoy this extremely delicious Tiramisu.  Thanks just a pinch for the recipe!  Mixed it up a bit and I think you can too if you can't find ladyfingers.

Happy Baking from my kitchen to yours,
  

M.J.


I am very skeptical about using raw eggs in any recipe so when I saw this recipe posted on justapinch.com I wanted to try making something similar.

I couldn't find ladyfingers at the grocery store so I substituted Almond Biscotti for the lady fingers.  The recipe turned out fine but I forgot to buy 2 packages as the recipe called for (24) so I wasn't able to layer mine. Surprisingly it turned out fine and it was super easy. 


Here's the finished product!  Make sure to refrigerate for several hours before serving and also carefully dip the ladyfinger or biscotti.  The biscotti absorb quickly.  


P.S.  I couldn't tell any difference except the Stella Doro had tiny pics of almonds going through them.  A great touch!  I should had had two packages but since I only bought one it was a single layer tiramisu which was fine. A keeper recipe!


Happy Baking from my kitchen to yours,


1 c
mascarpone cheese
5 Tbsp
powered sugar
1 tsp
vanilla
2 c
cool whip, thawed
1 c
coffee, strong and cooled
1 pkg
ladyfingers 24 count
1/2 c
cocoa powder
1/4 c
shaved chocolate


Mix mascarpone cheese, powered sugar, and vanilla.  When mixed well fold in cool whip

2

dip 12 lady fingers in the coffee, letting sit for a min. before placing on the bottom of a rectangle glass pan. (make sure you let lady fingers sit in coffee for a little while because it will be dry if they are not moist enough)depending on the pan you use, you sometime have to break some in half to completely cover bottom with ladyfingers.

3

pour half of the mascarpone cheese mixture over ladyfingers. shift cocoa powder evenly over mascarpone mixture. not to light but not to heavy, I put enough so you can hardly see the cheese mixture.

4

dip the last 12 lady fingers in the coffee and spread the rest of the mascarpone cheese mixture. do another med. layer of cocoa powder. this time sprinkle shaved chocolate over the top. I use about 1/4 or a little more on the top.

5

Let set in refrigerator for at least 2 hours.   4 or more is better!! Enjoy!!!


4/26/13
1/23/14

Saturday, October 27, 2018

Chocolate Brownies with Peanut Butter Frosting!

If you fancy chocolate and peanut butter..this one's for you! 7/16/12


This recipe was adapted from Betty Crocker's Kids Cook Book.  We added white chocolate and peanut butter morsels to it and used my recipe for peanut butter icing.  Deep chocolate taste and if you are a chocolate peanut butter lover it is a must!  I found it to be a bit involved(and it was in a kid's cookbook) but it was worth it. Enjoy!!

5 ounces unsweetened baking chocolate
2/3 cups butter or margarine
3 eggs
1 3/4 cups sugar
2 tsp. vanilla
1 cup flour
1/4 cup white chocolate morsels
1/3 cup peanut butter morsels

Heat oven to 350..Grease a 9 x9 inch pan (we used a 9 x 13)

In a sauce pan heat over low heat chocolate and butter or margarine until chocolate is melted..Take off heat and cool 5 minutes.

Put 3 eggs, sugar and vanilla in mixing bowl..Beat until well blended.  Add melted chocolate to sugar mixture.  Beat at low speed until blended..Add flour to chocolate mixture..Stir in white chocolate and peanut butter morsels. Spread batter in greased pan and bake approx. 40 to 45 minutes for 9 x9 inch pan..approx. 30 minutes for 9 x 13 inch pan.. Frost when completely cooled..

Frosting

2 cups confectionery sugar
2 tablespoons butter melted
approx. 1/4 cup milk(watch amount of milk,start with a little bit at a time)
1 cup peanut butter
Mix above ingredients in mixer..Slowly add milk a little at a time until desired consistency)


Monday, June 18, 2018

Chocolate zucchini bread


A wonderful recipe!  I had to re-post and share.

I have been seeing so many chocolate zucchini bread recipes being posted that I decided to give this one a try. My sister in law has one with coconut added in it but I felt that I wanted try this one I found online minus coconut. If you are a chocolate LOVER you will LOVE this bread for sure!!:)

  It's a first time for the I like to bake and cook lady to make a chocolate bread with zucchini in it.    My opinion on this bread was that not only was this bread, moist, tender, sweet, "chocolately" and had some chocolate chips in it too it wasn't overly sweet. Also when you bite into it you get a little bit of the chocolate pieces in almost every bite.  It is one of the best for sure!!  Enjoy! :)


I must have eaten 4 pieces.  I couldn't stop!!


A great cake to use plentiful zucchini


My helpful grandson


Oh so good chocolate chips


It was easy to remove from the pan.


Happy Baking and Cooking from my kitchen to yours,

M.J.


Chocolate Zucchini Bread from One Ordinary Day
Ingredients
1 & 1/2 Cups Shredded Zucchini
1 Cup All Purpose Flour
1/2 Cup high quality Unsweetened Cocoa Flour
1 Teaspoon Baking Soda
1/4 Teaspoon Baking Powder
Dash of salt
1/2 Teaspoon Ground Cinnamon
1/2 Cup Canola Oil
1/2 Cup Sugar
1/2 Cup packed Brown Sugar
2 Eggs
1 Teaspoon Vanilla Extract
3/4 Cup Dark Chocolate Chips
1/2 cup Coconut (optional)


Directions
In a mixer, combine your oil, sugars and vanilla. Mix in your eggs and shredded zucchini. In a separate bowl, sift together your flours, salt, cinnamon, baking soda and baking powder. Slowly add this dry mixture into your wet mixture. Beat until combined. Mix in your chocolate chips.
Scrape your batter into a greased 9x5x3 loaf pan, and bake at 350 degrees for 50-65 minutes, or until done.

Oh my! Heavenly!!! yum


8/3/12 original 
7/26/13 


All recipes and their respective images are the sole property of I Like to Bake and Cook2013, all rights reserved. All content herein is meant for your personal enjoyment only and is in no way to be used for commercial purposes. Use of this site automatically constitutes your agreement to these terms.

Friday, May 18, 2018

Tandy Cake


A great cake for a party or graduation.  Serves a lot of people.  Enjoy!

Comfort food big time!

I remember long ago when Tastycake cupcake company came out with the now famous Tandy cake cupcake.  We all loved those cupcakes and still do after many many years.  White cake with lots of peanut butter on top and then coated with milk chocolate.  OH how we loved and still love that cupcake!! I remember warming them slightly in the microwave so the chocolate would start to melt.  Do you have any of those memories?  I think if you have never tried a recipe like this today or this week would be a great time to make some food memories.

Today I decided to make the sheet cake version of that cupcake.  It's been a favorite from long ago and I thought you may like to make this for the family.  Warning!!!!! It is addicting!  Yum!


1 large cookie sheet (greased lightly)


1 cup milk
4 T margarine or butter(I like butter)
Warm milk, margarine and set aside to cool

Blend well in mixer:
 4 eggs
2 cups sugar (I cut back to 1 1/2 cups)
1 tsp. vanilla
1/2 tsp. salt or a little less

Add 2 cups flour, 2 T baking powder  to above while adding milk mixture slowly to blend.  Beat until soft.   Mixture will be runny.

Pour into greased cookie sheet and bake at 350 degrees for 15 to 20 minutes or more depending on your oven.  Use the toothpick in center test.

Note:  Cool 10 minutes before placing softened peanut butter on cake.


Last layer "Chocolate"!


While cake is baking place approx. 12 oz. creamy peanut butter in a measuring cup and place in microwave to soften, approx 30 seconds.

Stir peanut butter until it looks soft enough to spread.  Spread on slightly cooled cake and refrigerate until set.  Remove from refrigerator and top with melted chocolate*. 

*Place(2) two 8 oz. Large broken in pieces Hershey Bars in microwave and melt stirring occasionally to soften enough to spread on top of peanut butter.  Refrigerate until ready to serve.  Allow to set out of refrigerator a few minutes before slicing.  Cut in pieces.

Note:  Chocolate candy topping hardens so allowing cake to set for several minutes is a good idea.  I actually enjoyed the cake before I refrigerated it.  Just sayin :) 


5/5/15

Sunday, April 8, 2018

Monkey Muffins!!

 Make some of these yummy muffins for a quick breakfast for the kiddo's.  Cut back on sugar if you like.  You can easily decrease sugar to 1/2 cup and they'll never know.

  Healthy and a quick on the go breakfast with some milk will start their day in a healthy way!!

Note:  Make a double recipe and freeze for an easy grab and go breakfast. 


I like to make muffins for several reasons.  One: I love them as an easy breakfast!!  Two: when I make them I can freeze them and have them in the freezer for whenever I want them or I can quickly defrost for a quick snack so here's a cool recipe you may like especially if you like bananas, chocolate and peanut butter. I love that combination..  My favorite ice cream combination is banana and chocolate.   


Want to make a perfect muffin?  Use a traditional ice cream scooper!


Mini and regular muffins. You decide


1/2 cup butter softened
1 cup plus 1 tablespoon sugar, divided
2 eggs
1 cup mashed ripe bananas
2/3 cup peanut butter
1 tablespoon milk
1 tsp. vanilla extract
2 cups all purpose flour
1 tsp. baking soda
1/2 tsp. salt( if I am using salted butter I eliminate salt)
3/4 cup miniature semisweet chocolate chips

In a large bowl cream butter and 1 cup sugar until light and fluffy...Add eggs one at a time beating well after each addition..Beat in bananas, peanut butter, milk and vanilla. Combine flour, baking soda and salt.  add to creamed mixture just until moistened..Fold in chips

Fill a greased or paper lined mini muffin cups 3/4 full..Sprinkle with remaining sugar..Bake 350 degrees for 25 minutes or until a toothpick inserted in center comes out clean..Cool for 5 minutes before removing from pans to wire racks..Yield: several  dozen  If using mini muffin pans cut baking time to 14 to 16 minutes.  Note:  I used regular muffin cups.  Watch baking time!

Happy Baking from my kitchen to yours,


8/27/11 
3/25/13

Thursday, December 7, 2017

Peanut Butter Cup Fudge


Truth be told I saw this recipe on Facebook and it really had me craving chocolate and peanut butter so yep I made it.

I'm a little down but not out today so having a bit of chocolate to boost my moral is a good thing.  Maybe not for the calories but some good chocolate does make me happy.

This recipe was easy...simple and only 3 ingredients were the original recipe.  I decided to mix up the morsels and do half milk chocolate and half semi sweet.  Quite honestly I was concerned it may be too sweet!  LOL  so if you want to do it their way use all milk chocolate morsels.  Also I used smaller peanut butter cups so I had a thicker layer of peanut butter so it may not look as good as theirs but mine was fine for us.

Their peanut butter cups were larger in size and with the larger ones the peanut butter layer is much thinner. You decide.  


1& 1/2 cup milk chocolate morsels
1 &1/2 cup semi sweet chocolate morsels
1 can sweetened condensed milk
40 + small peanut butter cups or 25 large peanut butter cups

Line a baking dish with aluminum foil( my pan was 8 1/2 x 11) Press down and push foil into sides.  Allow some foil to extend over ends.  Note  It will allow you to remove it easily.


In a microwave safe bowl place chocolate chips and can of condensed milk. Stir and then place in microwave. Cook on high in 30 second intervals carefully stirring as not to burn. If not completely melted microwave again for an additional 10 second or until all mixes together. Mine took 40 seconds and they blended perfectly while stirring briskly.

Place on top of foil,  peanut butter cups enough to fill the whole bottom of pan.  Top with melted chocolate and spread on top of peanut butter cups.  Allow to cool completely.  Then refrigerate at least 3 to 4 hours.  Remove from refrigerator and allow to set for 5 minutes.  Turn over, remove foil and cut into squares with large knife. Enjoy!  


4/23/16


Wednesday, December 6, 2017

Chocolate macaroons!!

Here's another favorite of mine. I love chocolate and coconut too!

It rainy here in PA. I am  not going to complain because we could be up to our eyeballs in snow so I'm thinking comfort and Valentine's Day is only a month away so I'm trying some chocolate recipes this week. I found this one in Good Housekeeping magazine so I wanted to try it out and share my results..Maybe you have a special someone who might like this treat on Valentine's Day so you may want to bookmark this recipe.   I adapted this recipe to what I had in my pantry.  Enjoy!


4 large egg whites
1 1/2 cup sugar *( I used 3/4 cup)
1/4 tsp. salt
3 cups finely shredded unsweetened coconut *( I used sweetened coconut)
3 tablespoons all-purpose flour
3 tablespoons unsweetened cocoa
*1/2 tsp. vanilla extract or
*almond extract (watch amount)
8 oz. bittersweet chocolate, finely chopped * I used semi sweet chocolate morsels)
2 oz. white chocolate(optional) * (I used white chocolate morsels)


Preheat oven to 350 degrees.. Line 2 cookie sheets with parchment paper.

In a heavy duty saucepan, combine egg whites, sugar and salt.  Heat on medium until warm to the touch.  Stir in coconut, flour, cocoa, and vanilla.  Stir about 4 minutes or until gently sizzling.  Remove from heat.  Stir in 1/3 cup bittersweet chocolate until melted.  With a cookie scoop,or a teaspoon, scoop mixture into balls and place on prepared cookie sheets, spacing 1 inch apart.

Bake 15 minutes or until set and crisp around the edges. Cool completely on cookie sheet on wire rack..Store in airtight container at room temperature 1 day or in freezer up to two weeks.

To add an extra touch, In microwave safe bowl, microwave remaining chocolate on high in 30 second intervals, stirring frequently.  Dip top of macaroons in white or dark chocolate to coat if desired.

Note:  I used sweetened coconut so I cut my sugar down to 3/4 cup .  They were wonderful and I did not notice any difference when cutting down the sugar...I highly recommend these macaroons if you love coconut and chocolate they are a must try, and I found them to be very easy...

Happy Baking with love,


7/5/12 
12/2/13

Thursday, July 13, 2017

Marbled Brownies

Quick and so easy to make !

Marbled Brownies!  Yummy!


My Aunt Annie made these so many years ago and my children loved them.  She gave me the recipe many moons ago, (I think she thought it was her secret recipe) and I scribbled it down on a piece of paper and every now and again I make them because they really are as good today as they were then. Today I see a similar recipe on the back of brownie mixes so I think her secret is out!! lol

   The recipe was simple and easy. The only things I changed were I doubled the cream cheese and I drizzle icing on them..


Here is the recipe:

1 box Brownie mix(follow package instructions)
1- 8 oz. package cream cheese softened
1/4 cup sugar
1 egg
1 tablespoon flour
1 tsp. vanilla

Beat softened cream cheese,sugar, egg, vanilla and flour until smooth.

Heat oven to 350 degrees.  Grease a 13 x9 inch baking dish with Pam.  Make brownie mix according to package directions..Pour brownie batter into baking dish..Using a tablespoon drop approximately 6 to 8 tablespoons of cream cheese mixture over brownie batter..Swirl with knife..Bake according to directions..Cool completely before icing or cutting. Drizzle icing over the brownies if you would like. Yummy!!!!

***I like to Bake and Cook!  :)

Happy Baking from my kitchen to yours,

M.J.

7/26/11